Monday, May 31, 2010

Giveaway Winner!

I hope everyone is having a wonderful Memorial Day, spending it with friends and family.  Many heartfelt thanks go out to all who have served our country.

Now for the big news! I want to thank everyone who entered my latest giveaway.  All in all, we had 156 entries.  I used random.org to choose the winner.  So who was the lucky recipient?

The winner of the $100 gift card to Carrabba's is #20, Sarah of Passion and Paradise!


Congrats Sarah! I hope you enjoy your next meal at Carrabba's! I will be emailing you with details on how to claim your prize.

Thanks to everyone who entered.  Make sure you subscribe to my blog (on the left hand side bar) so you don't miss out on any future giveaways or any blog updates about good eats and sweet treats :)

Thursday, May 27, 2010

Croquembouche (DB)


The May 2010 Daring Bakers’ challenge was hosted by Cat of Little Miss Cupcake. Cat challenged everyone to make a piece montée, or croquembouche, based on recipes from Peter Kump’s Baking School in Manhattan and Nick Malgieri. The classic piece montée is a high pyramid/cone made of profiteroles (cream-filled puff pastries) sometimes dipped in chocolate, bound with caramel, and usually decorated with threads of caramel, sugared almonds, chocolate, flowers, or ribbons.


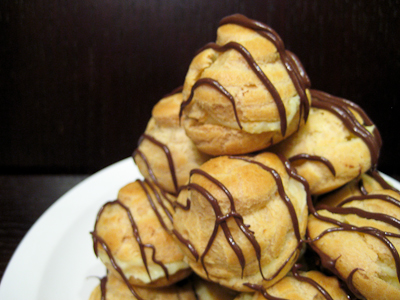
This recipe has 3 main components: the pate a choux, the crème patissiere, and the glaze used to mount/decorate it.  I've made eclairs and cream puffs before, so I was familiar with the technique involved in making the pate a choux.  I had never made a croquembouche, however, and have to say that mine was pretty simple and unimpressive.  I didn't have much time so I made a half batch and put it together with a chocolate glaze.  I probably should have used toothpicks to assemble mine, but since I was short on time I simply brushed the bottoms of them with chocolate glaze to mount them together.  I've seen some put together with fancy spun sugar on a few other blogs and wish I could have done something like that... but my husband's coworkers didn't seem to complain about these chocolate glazed puffs.
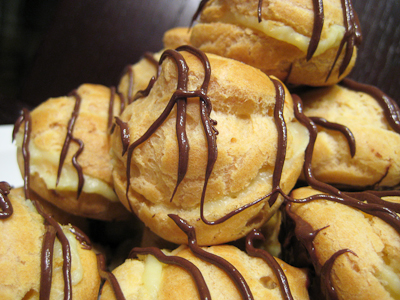


Thanks Cat, for hosting this month's challenge. I'm afraid I wasn't extremely "daring" with the assembly of my croquembouche, but life these days with a baby limits my time in the kitchen! Make sure you check out the Daring Bakers' Blogroll to see how everyone else stacked up.

Croquembouche

For the Vanilla Crème Patissiere (Half Batch)
1 cup (225 ml.) whole milk
2 Tbsp. cornstarch
6 Tbsp. (100 g.) sugar
1 large egg
2 large egg yolks
2 Tbsp. (30 g.) unsalted butter
1 Tsp. Vanilla

Dissolve cornstarch in ¼ cup of milk. Combine the remaining milk with the sugar in a saucepan; bring to boil; remove from heat.

Beat the whole egg, then the yolks into the cornstarch mixture. Pour 1/3 of boiling milk into the egg mixture, whisking constantly so that the eggs do not begin to cook.

Return the remaining milk to boil. Pour in the hot egg mixture in a stream, continuing whisking.

Continue whisking (this is important – you do not want the eggs to solidify/cook) until the cream thickens and comes to a boil. Remove from heat and beat in the butter and vanilla.

Pour cream into a stainless steel/ceramic bowl. Press plastic wrap firmly against the surface. Chill immediately and until ready to use.

For Chocolate Pastry Cream (Half Batch Recipe):
Bring ¼ cup (about 50 cl.) milk to a boil in a small pan; remove from heat and add in 3 ounces (about 80 g.) semisweet chocolate, finely chopped, and mix until smooth. Whisk into pastry cream when you add the butter and vanilla.

For Coffee Pastry Cream (Half Batch recipe)
Dissolve 1 ½ teaspoons instant espresso powder in 1 ½ teaspoons boiling water. Whisk into pastry cream with butter and vanilla.

Pate a Choux (Yield: About 28)
¾ cup (175 ml.) water
6 Tbsp. (85 g.) unsalted butter
¼ Tsp. salt
1 Tbsp. sugar
1 cup (125 g.) all-purpose flour
4 large eggs

For Egg Wash: 1 egg and pinch of salt

Pre-heat oven to 425◦F/220◦C degrees. Line two baking sheets with parchment paper.

Preparing batter:
Combine water, butter, salt and sugar in a saucepan over medium heat. Bring to a boil and stir occasionally. At boil, remove from heat and sift in the flour, stirring to combine completely.

Return to heat and cook, stirring constantly until the batter dries slightly and begins to pull away from the sides of the pan.

Transfer to a bowl and stir with a wooden spoon 1 minute to cool slightly.

Add 1 egg. The batter will appear loose and shiny.

As you stir, the batter will become dry-looking like lightly buttered mashed potatoes.

It is at this point that you will add in the next egg. Repeat until you have incorporated all the eggs.

Piping:
Transfer batter to a pastry bag fitted with a large open tip (I piped directly from the bag opening without a tip). Pipe choux about 1 inch-part in the baking sheets. Choux should be about 1 inch high about 1 inch wide.

Using a clean finger dipped in hot water, gently press down on any tips that have formed on the top of choux when piping. You want them to retain their ball shape, but be smoothly curved on top.
Brush tops with egg wash (1 egg lightly beaten with pinch of salt).

Baking:
Bake the choux at 425◦F/220◦C degrees until well-puffed and turning lightly golden in color, about 10 minutes.

Lower the temperature to 350◦F/180◦C degrees and continue baking until well-colored and dry, about 20 minutes more. Remove to a rack and cool.

Can be stored in a airtight box overnight.

Filling:
When you are ready to assemble your piece montée, using a plain pastry tip, pierce the bottom of each choux. Fill the choux with pastry cream using either the same tip or a star tip, and place on a paper-lined sheet. Choux can be refrigerated briefly at this point while you make your glaze.

Use one of these to top your choux and assemble your piece montée.

Chocolate Glaze:
8 ounces/200 g. finely chopped chocolate (use the finest quality you can afford as the taste will be quite pronounced; I recommend semi-sweet)

Melt chocolate in microwave or double boiler. Stir at regular intervals to avoid burning. Use the best quality chocolate you can afford. Use immediately.

Hard Caramel Glaze:
1 cup (225 g.) sugar
½ teaspoon lemon juice

Combine sugar and lemon juice in a saucepan with a metal kitchen spoon stirring until the sugar resembles wet sand. Place on medium heat; heat without stirring until sugar starts to melt around the sides of the pan and the center begins to smoke. Begin to stir sugar. Continue heating, stirring occasionally until the sugar is a clear, amber color. Remove from heat immediately; place bottom of pan in ice water to stop the cooking. Use immediately.

Assembly of your Piece Montée:
You may want to lay out your unfilled, unglazed choux in a practice design to get a feel for how to assemble the final dessert. For example, if making a conical shape, trace a circle (no bigger than 8 inches) on a piece of parchment to use as a pattern. Then take some of the larger choux and assemble them in the circle for the bottom layer. Practice seeing which pieces fit together best.

Once you are ready to assemble your piece montée, dip the top of each choux in your glaze (careful it may be still hot!), and start assembling on your cake board/plate/sheet. Continue dipping and adding choux in levels using the glaze to hold them together as you build up. (You may want to use toothpicks to hold them in place – see video #4 below).

When you have finished the design of your piece montée, you may drizzle with remaining glaze or use ribbons, sugar cookie cut-outs, almonds, flowers, etc. to decorate. Have fun and enjoy! Bon appétit!

Tuesday, May 25, 2010

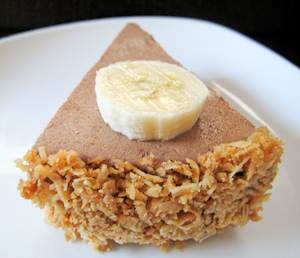
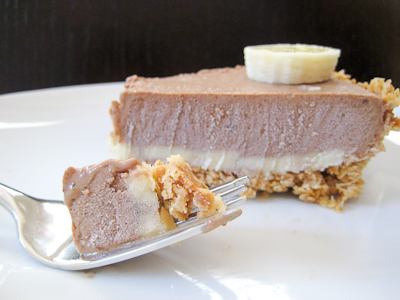
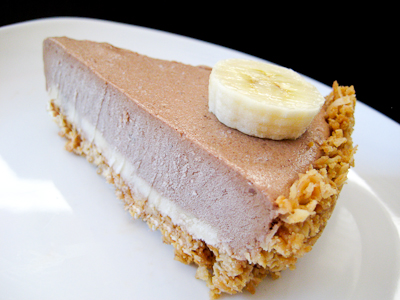
Banana Coconut Ice Cream Pie (TWD)


This week's Tuesdays with Dorie (TWD) recipe was chosen by Spike of Spike Bakes: Banana Coconut Ice Cream Pie.

When I was a kid, I loved going to Disneyland. We only lived 30 minutes from "the happiest place on earth," so I was lucky enough to get to go there at least once a year. Sure, I loved meeting the Disney characters, seeing the castle, and going on all the rides... but what did I really look forward to the most? The food :) I'm sure that if you're regular visitor to my blog, that can't really surprise you.

I'd love grabbing a churro and eating it while waiting in line for Splash Mountain. Or drinking one of those slushy lemonade drinks while waiting to board Star Tours. But my absolute favorite thing to get at Disneyland? Their frozen bananas! A banana dipped in chocolate, then rolled in peanuts and frozen to perfection! Yum!


Imagine my delight, then, when Rocky Mountain Chocolate Factory came about and started offering frozen bananas in their stores! I was thrilled that I no longer had to be at an amusement park to enjoy one of my favorite frozen treats.  I've even gone and made my own frozen bananas at home a few times, but I always feel so wasteful dipping anything in chocolate because you always end up with some excess in the bowl.

So, when Spike chose the Banana Coconut Ice Cream Pie, I was eager to make it. Just reading the recipe immediately took me back to my childhood memories of frozen bananas! It's a layer of chocolate banana ice cream atop a coconut crust, sandwiched between two layers of sliced bananas (although I layered lots of banana slices on top of my pie, for the blog photos I only added a single banana to the slice I photographed).

While I adore the flavors of chocolate and bananas together, I have to agree with my husband in saying that the crust is the star of this recipe! Unfortunately, I couldn't find the LU shortbread cookies that Dorie recommends so I used graham cracker crumbs instead. Still, butter + browned coconut + cookie crumbs = one amazing crust! I didn't have a deep dish pie plate, so I used a springform pan instead and didn't have any problems.


For the ice cream, instead of using store bought chocolate ice cream I decided to make Dorie's Chocolate Ganache ice cream. After I added in the bananas and rum to the ice cream, it almost didn't make it into the pie! I may have to make a batch of Chocolate Banana ice cream in the near future (a much better use of over ripe bananas than banana bread!)

I loved this pie and since making it this weekend I have eaten half of it all by myself! :) It totally reminds me of my childhood frozen banana favorite, only it's kicked up a notch with an amazing buttery coconut crust.

Thanks Spike, for hosting this week. The recipe for the Chocolate Ganache Ice Cream is below; if you would like the recipe for the pie, you can find it here. Make sure you check out the TWD Blogroll, to see how everyone else enjoyed this cool, summery treat! Also, you've got one more day to enter my $100 gift card giveaway while you're here :)

* Recipes notes:
- If you do not have shortbread cookies, you can substitute graham cracker crumbs.
- For tips from other TWD bakers, click here.


Chocolate Ganache Ice Cream
from Baking: From My Home to Yours by Dorie Greenspan

6 ounces bittersweet chocolate, finely chopped
1-1/2 cups heavy cream
1 cup whole milk
4 large egg yolks
1/3 cup sugar

Put the chocolate in a 2-quart liquid measuring cup or a large heatproof bowl. Bring ¾ cup of the cream to a boil. Pour the cream over the chocolate and let it sit for a minute, then, using a rubber spatula and starting in the center of the mixture, slowly stir the cream in to the chocolate in ever-widening concentric circles. When the ganache is smooth, set it aside.

Bring the milk and the remaining ¾ cup cream to a boil in a medium heavy-bottomed saucepan.

Meanwhile, in a medium bowl, whisk the yolks and sugar together until well blended and just slightly thickened. Still whisking, drizzle in about one third of the hot liquid- this will temper, or warm, the yolks so they won’t curdle. Whisking all the while, slowly pour in the remaining liquid. Pour the custard back into the pan and cook over medium heat, stirring without stopping, until the custard thickens slightly and coats the back of a spoon; of you run your finger down the bowl of the spoon, the custard should not run into the track. The custard should reach at least 170 degrees F, but no more than 180 degrees F, on an instant-read thermometer. Immediately remove the pan from the heat and slowly and gently stir the custard into the ganache.

Refrigerate the custard until chilled before churning it into ice cream.

Scrape the chilled custard into the bowl of an ice cream maker and churn according to the manufacturer’s instructions. Pack the ice cream into a container and freeze it for at least 2 hours, until it is firm enough to scoop.

Sunday, May 23, 2010

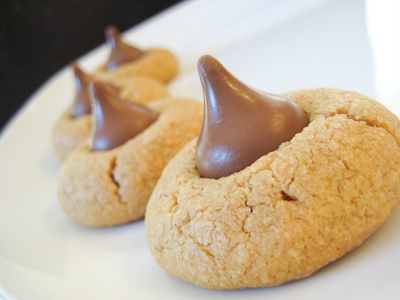
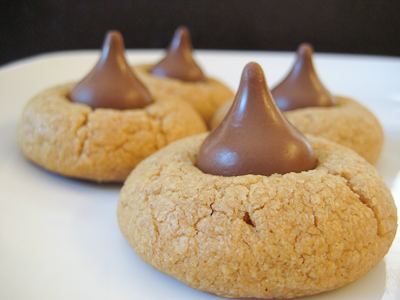
Flourless Peanut Butter Cookies


I love peanut butter cookies. Some people like the soft and chewy ones, others like the crunchy and crumbly ones. I love them all! When I came across this particular peanut butter cookie, I fell in love and immediately asked for the recipe. Turns out it was from some newspaper clipping and while I would love to give credit to whomever developed these little morsels of heaven, I have no idea where it came from.


What’s unique about these cookies is that they contain no flour! Just peanut butter, eggs, and sugar. Yep, that’s it. Easy peasy. They are very delicate cookies and will crumble if you’re not careful transferring from the cookie sheet to the cooling rack, but when you put one in your mouth and it almost melts in your mouth, you will know why I love these cookies so much. So, give them a try the next time you get a peanut butter craving, I promise you won’t be disappointed! (I've also made them without the kisses and they are still good so if you don't like chocolate (gasp) don't let that stop you from trying these.)

Also, don't forget to enter my giveaway while you're here :)


Flourless Peanut Butter Cookies
recipe source unknown

1 Jar (18 oz) creamy peanut butter
1-1/4 cups granulated sugar
2 large eggs
48 milk chocolate kisses (a 9 ounce package contains 53)

Heat oven to 350 F. Have cookie sheets ready. With a wooden spoon stir peanut butter, sugar, eggs in a medium size bowl until thoroughly blended. (Dough will be slightly sticky but don't worry, you'll still be able to roll it out.)

With floured hands, roll level measuring tablespoonfuls into 1-1/4 inch balls. Place 1-1/2 inches apart on ungreased cookie sheets. Bake 12 to 14 minutes until cookies look dry with tops crackled. Remove from oven and immediately press a chocolate kiss in center of each. Cool on cookie sheet 1 to 2 minutes, then
remove to wire racks to cool completely.

Yield: 48 cookies

Per cookie: 111
cal, 3 g protein, 10 g carb, 7 g fat, 12 mg cholesterol, 71 mg sodium.

Thursday, May 13, 2010

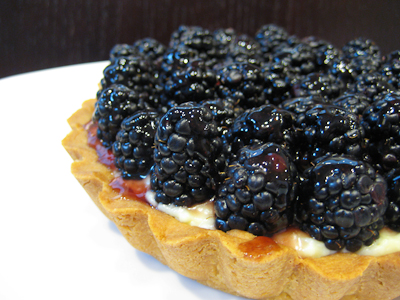
Quick Classic Berry Tart (TWD)


This week's Tuesdays with Dorie (TWD) recipe was chosen by Cristine of Cooking with Cristine: Quick Classic Berry Tart. I'm a few days late posting this but I was traveling on Tuesday and forgot to do this before leaving.

This week's post is going to be extremely short and sweet. Dorie's sweet tart dough. Vanilla pastry cream. Fresh blackberries topped with grandma's homemade blackberry jelly. Enough said :)


This tart was simple, classic, and delicious. Thanks Cristine, for hosting this week. If you would like the recipe, you can find it here. Make sure you check out the TWD Blogroll, to see how everyone else enjoyed this fresh, summery treat! Also, don't forget to enter my $100 gift card giveaway while you're here :)

* Recipes notes:
- For tips from other TWD bakers, click here.

Tuesday, May 4, 2010

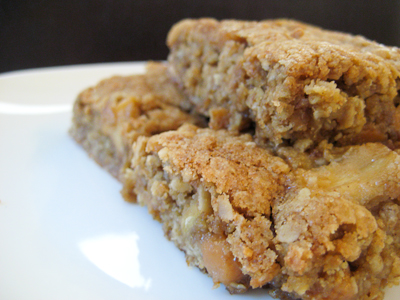
Caramel Apple Oatmeal Bars


This week's Tuesdays with Dorie (TWD) recipe was chosen by Becky of Project Domestication: Burnt Sugar Ice Cream. I had already made this recipe a few years ago, so if you'd like to hear my thoughts about it (I loved it), you can read my post here.

What I bring to you today, though, is a recipe that would pair wonderfully with the burnt sugar ice cream. A few weeks ago, a friend of mine was making some caramel apple oatmeal cookies from Cooking Light. I asked her for the recipe, and when she gave it to me she warned me that the dough came out really dry and crumbly. So, before setting out to make them, I read through the reviews on the website to see if this was a common problem and to check for any solutions. Indeed, it seemed like the vast majority of bakers found the dough too dry to work with. There were a few people who added an extra tablespoon or two of butter, but it didn't seem like there was any foolproof fix for this.


So, I decided to go about making my own recipe, using the general concept of a cookie with caramel, apples, and oats. Instead of using dried apples, I figured fresh caramelized apples would be better, and they would definitely add a little moisture to the recipe. So I browned some apples in some butter, brown sugar, and cinnamon. As I was getting ready to scoop the cookies onto my baking sheet, my baby started crying, so instead of making individual cookies, I decided to just pour all the batter into a baking pan and make bars instead of cookies :)

These turned out quite well if I do say so myself :) They are definitely much better the next day after the flavors have had a chance to meld. I had a bite fresh out of the oven and was a little disappointed, but when I went to have another bar the next day, I loved them! Although this recipe is loosely adapted from Cooking Light, it's about as close as I ever get to making my own recipe, so I hope you'll give this one a try and let me know how you like it!


Also, don't forget to enter my $100 gift card giveaway while you're here :)

Caramel Apple Oatmeal Bars
from Good Eats 'n Sweet Treats

For the apples:
1.5 tbsp butter (salted or unsalted)
2-2.5 cups diced Fuji apples (about 2 medium to large apples)
1 tsp cinnamon
1 tbsp brown sugar

For the bars:
1 cup (2 sticks) unsalted butter, softened and at room temperature
1 cup packed brown sugar
1/2 cup granulated sugar
2 eggs
1/2 tbsp vanilla extract
1-1/2 cups all purpose flour
1 tsp baking soda
1 tsp cinnamon
1/2 tsp salt
2-1/2 cups oats (quick or old fashioned)
1 cup Kraft caramel bits (you can substitute toffee bits if you'd like)

Preheat the oven to 350F.

Melt 1.5 tablespoons of butter in a large nonstick skillet over medium-high heat. When the foam subsides, toss the diced apples in and cook, turning once, until they are golden brown, about 3 minutes. Sprinkle the apples with 1 teaspoon of cinnamon and 1 tablespoon of brown sugar and cook them, turning, just until coated, another minute or so. Transfer the apples to a small bowl and let cool while you make the cookie dough.

In a small bowl, sift together the flour, baking soda, 1 teaspoon of cinnamon, and salt.

In a large mixing bowl, beat the butter and sugars until light and fluffy, about 2-3 minutes. Add the eggs, one at a time, mixing well between each addition. Add the vanilla.

Turn the mixer down to low and add the dry ingredients, mixing just until they are incorporated.

Stir in the oats, caramel bits, and apples. Mix well.

Pour the dough into an ungreased 13 x 9-inch metal baking pan and bake for 30-35 minutes or until a toothpick inserted into the center comes out clean. (If making cookies, bake for 10-12 minutes until golden brown.)

Let cool completely before cutting into bars. These taste best when wrapped well and served the following day.

Monday, May 3, 2010

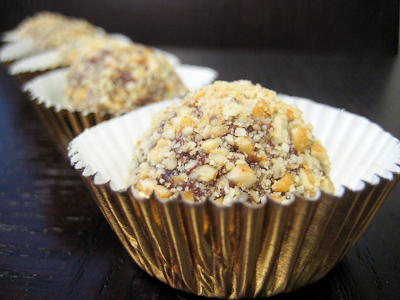
Peanut Butter Truffles (SMS)


This week's Sweet Melissa Sundays (SMS) recipe was chosen by Mara of Love Your Mother: Peanut Butter Truffles. I'm a day late with this one but could not pass up chocolatey peanut butter candies!

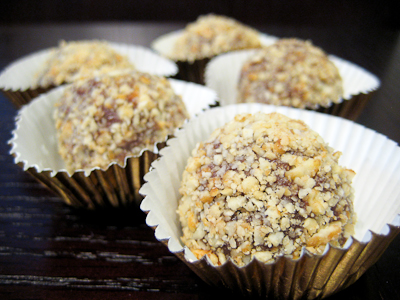
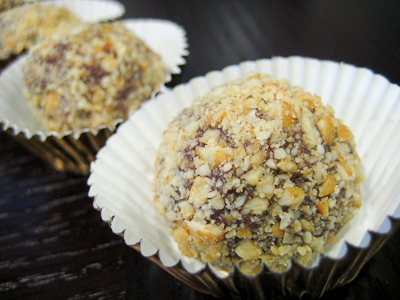
The recipe is straight forward and easy. Just heat up some cream and peanut butter, pour it over some chopped chocolate to melt the chocolate, then add some butter. Refrigerate until firm, then form into balls and roll in peanuts. That's it.


I found the chocolate to be very soft and hard to work with, even after chilling in the refrigerator for 6 hours. The best way to make these would probably be to roll them into balls and then freeze them. You can then take the frozen truffle balls and dip them in chocolate. Several SMS bakers did this with great success. I made a few truffles as directed in the recipe, and have the rest in the freezer right now so I can dip them in chocolate... but, since I'm already a day late posting, I thought I'd get this post up with at least what I've made so far.


Based on recommendations from other SMS bakers, I went ahead and doubled the amount of peanut butter in these truffles and I think they turned out great. You can certainly taste the peanut butter in them and the chocolate is so smooth and creamy. If you would like the recipe, you can find it here. Make sure you check out the Sweet Melissa Sundays Blog Roll to see how everyone else enjoyed these peanut buttery treats.

* Recipe notes:
- I used semisweet chocolate chips instead of bittersweet chocolate.
- I also doubled the peanut butter and used a half cup.
- For more tips, click here.