Tuesday, February 28, 2012

Einstein Bros Bagels: Buy 1 Get 1 FREE Lunch Sandwich Coupon

If you have an Einstein Bros Bagels nearby, just head on over to their Facebook page and click the link on their wall to get a buy one get one FREE lunch sandwich coupon!

Note that they will email the coupon to you and it expires March 4th.

Monday, February 27, 2012

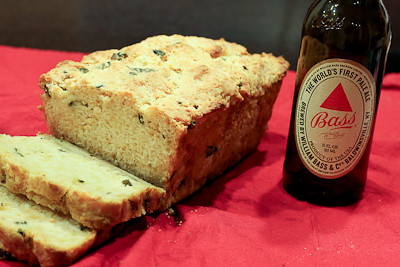
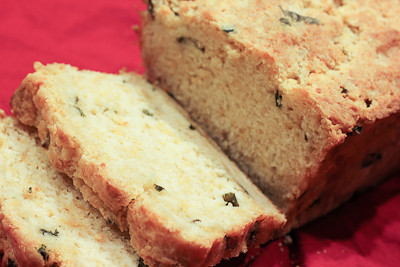
Green Onion, Cheddar & Asiago Beer Batter Bread (DB)


The Daring Bakers' February 2012 host was – Lis! Lisa stepped in last minute and challenged us to create a quick bread we could call our own. She supplied us with a base recipe and shared some recipes she loves from various websites and encouraged us to build upon them and create new flavor profiles.

I was in the mood for something savory, not sweet (crazy, I know!) so I went with the green onion, cheddar & asiago beer batter bread!  Everything came together quickly and easily, and the smell of the bread baking in the oven was magnificent! I used a slightly smaller loaf pan (8.5" x 4.5") and that did not seem to affect the baking time much.

My bread was moist and fluffy and full of flavor! I love how the top of the loaf became crisp from brushing the butter on top! So good.  I think next time I'll also sprinkle some cheese on top as it's almost done baking to get a crisp, cheesy crust.  And maybe bake it in a muffin pan, to increase the ratio of buttery, cheesy crust to middle :) The best thing about this bread? It comes together so quickly! I'll definitely be making this one again.

Thanks Lis, for hosting this month's challenge.  You'll find the recipe below - be sure to read all the tips/notes below the recipe, as there is some useful information on quick breads there. Also be sure to check out the Daring Bakers' Blogroll to see how everyone else enjoyed the challenge.

Green Onion, Cheddar & Asiago Beer Batter Bread  
Makes one 9” x 5” (23 x 13 cm) loaf
Adapted from Recipe Girl’s Cheddar Chive Beer Batter Bread


Ingredients
1 tablespoon (15 ml) oil
1 cup (240 ml) (100 gm/3½ oz) sliced green (spring) onion
3 cups (720 ml) (420 gm/15 oz) all-purpose (plain) flour
3 tablespoons (45 ml) (45 gm/1½ oz) granulated sugar
2 teaspoons (10 ml) (10 gm) baking powder
1 teaspoon (5 ml) (6 gm) salt
1 cup (240 ml) (115 gm/4 oz) grated sharp cheddar cheese
½ cup (120 ml) (2 oz) grated Asiago cheese
One (12 fl oz/355 ml) (about 1½ cups) bottle beer (such as amber ale)
¼ cup (60 ml) (55 gm/2 oz) butter, melted and divided

Directions:
  1. Preheat oven to moderately hot 375°F/190°C/gas mark 5. Spray 9”×5″ (23 x 13 cm) loaf pan with cooking spray.
  2. Heat olive oil in a large nonstick skillet over medium heat. Add green onion and sauté 3-4 minutes or until tender. Cool to room temperature.
  3. Combine flour, sugar, baking powder and salt in a bowl; make a well in the center of the mixture. Add onion, cheeses, and beer. Stir just until moist.
  4. Spoon batter into prepared pan. Drizzle evenly with 2 tablespoons of butter. Bake for 35 minutes; brush with remaining 2 tablespoons butter. Bake an additional 23 minutes or until wooden pick inserted in the center comes out clean. Cool 5 minutes in pan on a wire rack; remove from pan. Cool completely on wire rack.
Quick bread primer
  • Quick breads can be sweet or savory, they are a modern innovation they became common after the introduction of baking powder and baking soda.
  • Baking powder is a combination of acid and alkaline that reacts together when moistened to form gases that raises the baked quick bread. Usage 1 to 2 teaspoons per cup of flour.
  • Baking soda (an alkaline salt, sodium bicarbonate) is used when the liquid is acidic, such as buttermilk, honey, molasses, tomato sauce etc. Usage ½ to 1 teaspoon per cup of acidic liquid.
  • Be sure your baking powder and baking soda are fresh.
  • Measure ingredients accurately, using the measuring tools and techniques suggested.
  • Preheat the oven to the correct baking temperature. Arrange racks so that the bread will bake in the center of the oven which has the best heat distribution in the oven.
  • To allow for good air circulation while baking, leave at least 1 inch of space between pans and between pans and sides of oven. Switch pan positions and rotate pans halfway through baking.
  • The two top secrets to moist, tender quick bread is 1)in the mixing always use a quick light technique so you don't over-mix the batter 2) don't over-bake since this cause dryness in the final baked product. .
  • Quick breads can be created by the following methods:
Muffin (or the two-bowl) method – The dry and wet ingredients are kept separate and then are combined quickly and gingerly by adding the wet to the dry, and folding the two together with only a few strokes. The idea is to not over-mix, basically moistening the ingredients and leaving the batter slightly lumpy, with wisps of flour showing (even small lumps are fine) so as not to overdevelop the gluten in the flour which will keep the bread tender. An over mixed batter creates tough and rubbery muffins/quick breads. Since over-mixing will cause "tunnels" – holes where the air bubbles can escape – which will make the quick bread tough.
Creaming method – The butter and sugar are beaten and creamed together until smooth and fluffy. Next, the egg and liquid flavoring are added to the butter and sugar mixture. The dry ingredients and other liquids are folded in last. This method is best when baking cakes since a lot of air pockets are added into the mixture. Folding in the ingredients creates even more air pockets to keep the cakes light and fluffy.
Cutting in method – The chilled fat is cut into the flour. The fat results in a flaky texture since the fat melts while in the oven. This method is best used when baking biscuits, scones or pie crusts.
  • Depending on the recipe and the type of quick bread, there are also three different types of batter:
Pour Batter: This type of batter has a dry:liquid ratio of 1:1. Because there is so much liquid in this type of batter, the result is very moist and dense.
Drop Batter: This batter has a dry:liquid ratio of 3:1. This batter will result in a moist but fluffy baked good.
Stiff Dough: This batter has a dry:liquid ratio of 7:1 This batter will result in a very light and fluffy baked good.
  • Lower gluten flours are best to make quick breads you can replace 4 tablespoons in each cup of all-purpose flour with cake flour in most recipes or replace 2 tablespoons in each cup of all-purpose flour with corn flour (cornstarch) if you wish to lower the gluten levels of your flour.
  • Flour should be sifted to aerate it which gives more rise therefore a lighter crumb to the final baked goods.
  • Add fruit, nuts, etc. after lightly combining the wet and dry ingredients. Then give the batter one more light-handed stir and you're done. Is the batter still thick and lumpy? That's exactly what you want
  • If you're adding dried fruit, try soaking it first. This will moisten the fruit, make it tender and juicy, and also preserve the bread's moisture. Don't sprinkle dried fruit on top of quick bread before baking, as it will burn before the loaf is done.
  • To lower the fat, for example, you can substitute some (or all) of the oil with an equal amount of almost any fruit puree (apple sauce, plum baby food, pumpkin puree, mashed bananas).
  • Glaze your baked quick breads for a nice finishing touch and burst of flavor. Make a simple mixture of confectioners' (icing) sugar and a little milk or fruit juice. Try orange and lemon juices, for their fragrant, tart zing; add curls of zest for extra color and flavor.
  • For most quick mix recipes as a general rule – less butter and sugar in a recipe makes it more bread-like, while more butter and sugar produces something closer to cake.
  • To prevent moist quick breads from spoiling, let them cool completely after baking. Then wrap them tightly in foil or plastic wrap and store at room temperature for up to 3 days. If your bread is made with cheese, cream cheese or other perishable foods, it should be refrigerated.
  • Quick breads such as banana, zucchini and cranberry slice and taste best when served a day after baking. Wrap the cooled bread in foil or plastic wrap; leave at room temperature overnight. Others like cornbread and coffee cakes are best served warm.
  • The quick bread is done if a toothpick inserted near the center comes out clean. If it is not done, test again in a few more minutes.
  • Cool in the pan for 10 minutes, unless recipe directs otherwise. Turn loaves out onto a wire rack to cool. Most quick bread should be cooled completely before slicing to prevent crumbling.
  • Using a sawing motion, cut loaves with a thin sharp knife. Use a serrated knife for quick breads that have fruits and/or nuts.
Common Problems and troubleshooting (ref http://allrecipes.com/howto/baking-quick-breads/)

Bread sticks to pan. Unless you're using high-quality non-stick metal or silicone baking pans, you should always grease the pans before you pour in the batter. The best thing to use for greasing the pan is shortening, because its melting point is higher than any other kind of fat, which helps maintain a "shield" between pan and batter while the bread is baking. A high-quality cooking spray--one that won't bake on to your pans and discolour them--is also a fast, easy fix. You can also prevent sticking by removing the bread from the pan sooner: let the bread cool for at least twenty minutes in order to set (Bundt loaves should cool twice as long) before inverting the pan.

There are big holes and "tunnels" in the bread, and/or the bread is tough. These problems are usually caused by over-mixing.

There's a big crack down the middle of the quick bread loaf. Don't worry--it's normal for quick breads. The crack on top happens when top of the loaf "sets" in the heat of the oven before the bread is finished rising. Drizzle the loaf with icing or dust with confectioners' (icing) sugar.

My blueberry muffins look green! By reacting with the alkaline baking soda, the blueberries' pigments can turn green. Toss the berries with the flour mixture before combining the ingredients; the coating should help. If you're using frozen berries, don't thaw them before using them.

The bread looks done on the outside but it's still raw in the middle. This is one of the most common quick bread problems, and it can be caused by a few different factors. The oven temperature could be too high. (Use an oven thermometer to check: they're cheap and available at most supermarkets.)

Try lowering the oven temperature and/or putting a loose tent of foil over the top of the bread so it won't burn before the middle has time to catch up.

Another cause of "raw center" syndrome could be using a different pan than the recipe calls for. One of the nice things about quick breads is that you can use the same batter to make muffins, mini loaves, jumbo loaves, or rounds. But each size requires different baking times--and some require different baking temperatures. The larger and thicker the loaf, the longer it's going to take to bake. If you're using a different size pan than your recipe calls for, adjust the baking time accordingly and check the bread often.

Saturday, February 25, 2012

Giveaway: FREE ShopRunner Membership

I'm going to do a quick giveaway here... up for grabs is a FREE one year membership to ShopRunner.  If you've never heard of ShopRunner, they offer Free 2-day shipping on select items from several different online retailers.  The ones in the food & gift category include Candy.com, Chefs Catalog, David's Cookies, Dominos, and igourmet.com, but you can check out the full list of online retailers (including Drugstore.com, Babies "R" Us, Toys "R" Us, etc.) here.

To enter, simply leave me a comment below telling me which recipe on my blog is your favorite (the name of the recipe will suffice, links are optional).  You can earn (2) additional entries if you "like" Good Eats 'n Sweet Treats on Facebook, or if you follow my blog.  Just leave a separate comment for each additional entry.  Please make sure you leave an email address where I can contact you, should you be chosen as the winner!

Please note that comment moderation is in place, so there may be some time before your comment appears below.  I will also be verifying the Facebook and follower entries, so if you don't see that comment/entry pop up, it's because I can't find your name on the list(s).

Giveaway will be closed after 9pm CST on 2/28/12 and winner be will announced shortly thereafter.  Due to some time constraints on this membership deal, the winner will have 18 hours to claim the prize, after that an alternate winner will be chosen.  Good luck!

*** Update - giveaway is now closed and the winner, Sarah, has been contacted. (Sorry Amy, you were actually chosen first but you did not leave me an email address where I could contact you and there was no where to leave a comment on your blog!) ***

Wednesday, February 22, 2012

FREE Coconut Oil, $0.20 K-cups, and More!


Did you miss the last deal I posted on free coconut oil? I'm a bit late posting, as this deal is only good today, 2/22, but there's still a few hours left in the day for anyone interested! Today only, Vitacost.com is having a sale and they have reduced their shipping fee from $4.95 to $2.22, plus orders over $22 ship completely free.

So, you can order 3 jars of coconut oil ($2.46 x 3) + $2.22 shipping = $9.60 and with your $10 sign up bonus your order will be FREE!

Or maybe you'd like to get something like the 18 count box of Clif Organic ZBar Chocolate Chip Bars ($13.97). Buy 1 case and use your $10/$10 code. Your total will be $6.19 or just $0.34 per bar!

Or maybe you'd like to get Twinings Tea 25 K-Cups $12.75.  After the $10/10 code it's only $2.75 + $2.22 shipping or just $0.20 per K-cup!

Here's how:
1) Use this link to sign up and get a $10 promo code sent to your email.  After you register for an account with Vitacost.com (it must be through the link provided) you will receive an email with the subject line "Here's your $10 coupon for Vitacost.com" (this may take an hour)

2) Then add 3 jars of coconut oil to your cart for $2.46.  You can then add other low dollar items to your cart until it totals $10.  As long as your total is under $10, when you use the $10 off code sent to your email, your order will be completely FREE!

Of course, feel free to look around their website for other items.  You might like the Chocolove Almonds and Sea Salt in Dark Chocolate Bar or some of these other low priced chocolate products

Also, don't forget to add 2 free samples to your cart before checking out (they've got a few different teas and other samples available).  Happy shopping! (And act fast, as this deal expires at midnight EST tonight)

Tuesday, February 21, 2012

$4/4 Kellogg's Cereals

Did you miss the $5/5 Kellogg's cereals coupon I posted the other day? If you did, hurry on over to Coupons.com and use zip 30303 to print a $4/4 Kellogg’s Cereals coupon today!  You can use pair this coupon with some upcoming sales to get some really great deals!

While you are there, if you live in Idaho or Utah, you may also want to print this $0.75/1 gallon or $0.75/2 half gallons of milk coupon (use zip 84121)!
Remember that each coupon has a limited number of prints, so if you don't see it, it may no longer be available.  So act fast, and print these coupons now! (Also keep in mind that you can print each coupon two times from each computer.)

Chocolate Truffle Tartlets (TWD)

I'm so excited to be co-hosting this week's Tuesdays with Dorie: Baking with Julia along with Jessica of Cookbook Habit, Spike of Spike Bakes, and Steph of A Whisk and a Spoon. Just in time for Valentine's Day, we baked Chocolate Truffle Tartlets.

I made this recipe over the course of a few days.  I started the tart dough over the weekend and refrigerated it for a few days before making my tarts. This tart dough recipe is a little different from Dorie's tart dough we've been using the last few years - instead of pressing chunks of dough into the tart, this one is rolled out and then set into the tart pan, similar to what you would do with a traditional pie crust.  When I removed it from the fridge, I could not immediately shape it into a round, it was way too hard. So I let it sit out on the counter for about 30 minutes first. After that, rolling it was a breeze as long as I floured it generously. If a piece came off on my rolling pin, I simply pressed it back down. You don’t need your tart dough to be perfectly even for this recipe :)

As with most chocolate recipes, I used semisweet chocolate chips instead of chopped chocolate in the double boiler.  The "chocolate truffle" filling in these tarts is basically whipped egg yolks with chocolate, butter, and sugar.  It is rich and creamy and delicious.  Before pouring the filling into the tart pans, you add some chopped milk and white chocolate chunks (I used semisweet chocolate chips and white chocolate chips) and bits of biscotti for crunch.  I did not have any biscotti on hand so I omitted it, but I definitely think a little crunch would have been great in these tarts.  Next time I may try throwing some toffee bits in there for crunch and more flavor.  We'll have to see if the toffee bits survive the bake, or if they just melt away into the filling...

I baked these in (2) 5.5″ tart pans and there was the perfect amount of filling to fit in these 2 pans. Apparently the recipe directs you to remove the bottom of your tart pan before starting, but I must have glossed over that part because I didn't even notice that until I started reading the P&Q.  I also did not place my tart pans on a baking sheet because in past experience with TWD, that never worked well for me.  I baked these tart pans directly on the oven racks and with the tart bottoms in my pans without any issues. I did have to bake for an additional 15-20 minutes, though, due to the larger size of my tart pans.

The texture of these tarts is a bit hard to describe.  It reminded me quite a bit of a chocolate chess pie.  Not really cakey or brownie-like, and not fudgey either.  Just velvety smooth chocolate goodness? :) The extra chopped chocolate and biscotti are really what make this dessert special, in my opinion.  They add some extra texture to each bite.  Otherwise it would be a little boring (if you could really ever call chocolate boring!).  My husband loved these and exclaimed that these tarts were "one of the best things you've made in a while." (Not sure if that was a compliment on how good these were, or a comment on how bad the other stuff I've been making is??? Ha!)

This recipe is definitely a keeper, and it was certainly the perfect sweet to share on Valentine's Day.  You can find the recipe below, but be sure to check here, to see how all the other bloggers in our group enjoyed this week's chocolately treat!


Chocolate Truffle Tartlets
Recipe by David Ogonowski, from Baking with Julia by Dorie Greenspan

Makes 6 individual tartlets

1 recipe Chocolate Dough [see below], well chilled
5 tablespoons unsalted butter, cut into 10 pieces
6 ounces bittersweet chocolate, finely chopped
8 large egg yolks
1 teaspoon pure vanilla extract
1/4 cup sugar
2 ounces white chocolate, cut into small dice
2 ounces milk chocolate, cut into small dice
4 biscotti, homemade or store-bought (you can use amaretti di Saronno), chopped

Line a jelly-roll pan with parchment paper and keep at hand. Remove the bottoms from six 4 1/2-inch fluted tartlet pans (or use pans with permanent bottoms and just plan to pop the tartlets out once they're filled, baked, and cooled); spray the pans with vegetable oil spray or brush with melted butter.

Cut the dough into 6 even pieces. Working with one piece at a time, shape the dough into a rough circle, then tamp it down with a rolling pin. Flour the work surface and the top of the dough and roll it into a circle 1/8 to 1/4 inch thick. As you roll, lift the dough with the help of a dough scraper to keep it from sticking. If the dough breaks (as it sometimes does even when the pros are rolling it), press it back together and keep going - it will be fine once it's baked. Fit the dough into a tartlet ring, pressing it into the fluted edges and cutting the top level with the edges of the pan. Again, patch as you go. Use a pastry brush to dust off any excess flour and place the lined tartlet ring on the prepared baking pan.

Chilling the crusts: When all of the shells are rolled out, chill them for at least 20 minutes.

Baking the crusts: Center a rack in the oven and preheat the oven to 350 degrees F.

Prick the bottoms of the crusts all over with the tines of a fork and bake for 12 to 15 minutes, rotating the pan halfway through the baking time, until the crusts are dry, blistery, and firm. Transfer the baking pan to a rack so that the crusts can cool while you make the filling. Reduce the oven temperature to 300 degrees F.

Making the filling: Bring an inch of water to the simmer in a saucepan. Put the butter and bittersweet chocolate in a large metal bowl and place the bowl over the saucepan - don't let the bottom of the bowl touch the water. Allow the butter and chocolate to melt slowly, stirring from time to time, as you work on the rest of the filling. Remove the chocolate from the heat when it is melted and allow it to cool until it is just slightly warmer than room temperature.

Put the yolks and vanilla extract in the bowl of a mixer fitted with the whisk attachment or in a large mixing bowl. Using the whisk or a hand-held mixer, start beating the yolks at medium speed and then, when they are broken up, reduce the speed to low and gradually add the sugar. Increase the speed to medium-high and beat the yolks and sugar until the yolks thicken and form a slowly dissolving ribbon when the beater is lifted.

Spoon about one third of the yolks onto the cooled chocolate mixture and fold them in with a rubber spatula. Don't worry about being too thorough. Pour the chocolate into the beaten yolks and gently fold the two mixtures together until they are almost completely blended. Add the cubed chocolates and biscotti, folding to incorporate the chunky pieces.

Baking the tartlets: Using an ice cream scoop or 1/4-cup measure, divide the filling evenly among the cooled shells. Smooth the filling with a small offset spatula, working it into the nooks and crannies as you circle the tops of the tarts. Bake the tarts for 10 to 12 minutes, until the tops look dry and the filling is just set. Remove to a rack to cool for about 20 minutes before serving.

Storing: Best the day they're made, these are still terrific after they've been refrigerated - they lose their textural finesse, but the taste is still very much there. For longer keeping, wrap the tartlets airtight and freeze them for up to a month. Thaw, still wrapped, at room temperature.

Chocolate Dough Recipe

Makes enough for six 5-inch tartlets or one 10-inch tart

1 1/4 cups all-purpose flour
1/4 cup unsweetened cocoa powder, preferably Dutch-processed
1/4 cup sugar
1/4 teaspoon salt
1 stick (4 ounces) cold unsalted butter, cut into small pieces
1 large egg yolk
1 tablespoon ice water

To make the crust by hand, put the flour, cocoa, sugar, and salt on a smooth work surface, preferably a cool surface such as marble. Toss the ingredients together lightly with your fingertips, then scatter the butter pieces across the dry ingredients. Use your fingertips to work the butter into the flour mixture until it forms pieces the size of small peas. Then use a combination of techniques to work the butter further into the flour: Break it up with your fingertips, rub it lightly between your palms, and chop it with the flat edge of a plastic or metal dough scraper.

Gather the mixture into a mound, make a volcanolike well in the center, and pour in the yolk and ice water. Use your fingers to break up the yolk and start moistening the dry ingredients, then, just as you did with the flour and butter, toss the ingredients with your fingers and use the dough scraper to chop and blend it. The dough will be crumbly and not really cohesive. Bring it together by smearing small portions of it across the work surface with the heel of your hand.

Chilling the dough: Gather the dough together and shape it into a rough square. Pat it down to compress it slightly, and wrap it in plastic. Chill until firm, at least 30 minutes.

To make the dough in a food processor fitted with the metal blade, put the flour, cocoa, sugar, and salt in the work bowl and pulse just to blend. Add the butter and pulse 8 to 10 times, until the pieces are about the size of small peas. With the machine running, add the yolk and ice water and process, in bursts, just until crumbly - don't overwork it. Turn it out onto the work surface and, working with small portions, smear the dough across the surface with the heel of your hand.

Chilling the dough: Gather the dough together and shape it into a rough square. Pat it down to compress it slightly, and wrap it in plastic. Chill until firm, at least 30 minutes.

Storing: The dough can remain in the refrigerator for 3 days, or it can be wrapped airtight and frozen for a month. Thaw the dough, still wrapped, overnight in the refrigerator before rolling it out.

Friday, February 17, 2012

FREE Activia Yogurt at Target

Hurry on over to Coupons.com and use zip 84121 to print a $1/1 Activia yogurt 4-pack! Pair this coupon with the $2/2 Activia yogurt 4-pack coupons available at Target.com and you'll get FREE yogurt!

Here's how:

Buy (2) Activia yogurt 4-packs at $2 each = $4
Use 2 x $1/1 coupons found here
Plus the $2/2 Target coupon found here
Final cost is FREE!

While you are there, you may also want to print this Starbucks coupon for a $1 Starbucks petite with purchase of any handcrafted drink!

Remember that each coupon has a limited number of prints, so if you don't see it, it may no longer be available.  So act fast, and print these coupons now! (Also keep in mind that you can print each coupon two times from each computer.)

FREE Softsoap Antibacterial Hand Soap

Today only, you can get FREE Softsoap Antibacterial Hand Soap after Wild Cash Back Reward.  I realize that soap isn't really a "good eat" or a "sweet treat," but if you are like me, I always make a mess in the kitchen and end up washing my hands about ten times a day.  So I could always use some free soap :)

* Head over to ShopAtHome.com and log in/register for an account
* On the right hand side you'll see a box with "Web's Incredible Limited Deals" that looks like this:

* Click on the "view" button under the Softsoap and you will be redirected to Staples.com
* Add the Softsoap Hand Soap 7.5 oz to your cart
* Head to checkout and you’ll pay just $1.49 + FREE shipping
* Within 30 days, you receive $1.49 Wild Cash Back Reward in your ShopAtHome.com account

Your final cost will be whatever tax is in your state on the $1.49 (so it was only  $0.12 for the Softsoap Hand Soap shipped right to my door!)

If you are new to ShopAtHome, it is a really great cashback site.  Simply go to their page and click through their various store links before you make an online purchase and you will receive cashback on every purchase! It is similar to cashback sites like BigCrumbs and eBates, but what I like best about ShopAtHome is they have a 110% cashback guarantee! So, if you find any other site that offers a higher % of cashback, they will match it plus 10% more.  I always go to cashbackmonitor.com and look for the best cashback offer before purchasing, then I get ShopAtHome to give me the 110%! More details about the 110% guarantee can be found on ShopAtHome's site.

$5 off Kellogg's Cereals

Hurry on over to Coupons.com and use zip 84121 to print a **HOT** $5/5 Kellogg’s Cereals 10 oz+ coupon!  You can use pair this coupon with some upcoming sales to get some really great deals!

Here are a few places you may want to use the coupon:

Publix (2/18 and Sunday 2/19 ONLY)
all Kellogg’s cereal will be on sale 50% off

CVS (starting 2/19):
Kellogg’s Raisin Bran or Raisin Bran Crunch 15-18.2 oz 3/$7
Use the $5/5 coupon found here
Final cost as low as $1.33 each!

Plus, you can sweeten the deal if you grab the SavingStar e-coupon $0.70/1 Kellogg's Krave cereal here, making the boxes $1.19 each!

Walgreens (starting 2/19):
Select Kellogg’s cereal 12-18.2 oz 2/$5 or $2.99 each
Use the $5/5 coupon found here
Final cost as low as $1.50 each!

While you are there, if you live in Idaho or Utah, you may also want to print this $0.75/1 gallon or $0.75/2 half gallons of milk coupon!
Remember that each coupon has a limited number of prints, so if you don't see it, it may no longer be available.  So act fast, and print these coupons now! (Also keep in mind that you can print each coupon two times from each computer.)

Monday, February 13, 2012

Haribou Coupon


Right now there is a $0.30/1 Haribou coupon on coupons.com  These candies are $1 at Target right now, so you can get some for just $0.70.  Or if you live near Rite Aid, these bags of candy are on sale for only $0.88 at Rite Aid this week, so only $0.58 after this coupon.

Wednesday, February 8, 2012

FREE Coconut Oil, Chocolate, etc!


*** NOTE: The free shipping promotion has expired (all items under $10 sold out), but you can still sign up to get the $10 off coupon.  You'll have to pay $4.95 shipping for your order if it is under $49, so you can order $10 worth of merchandise and pay $4.95 out of pocket (essentially making it a $5 off coupon).  You could try to make a $5 purchase and see if they will allow you to use the $10 coupon towards shipping costs.  If you do this, please come back and let me know if that works!

Get a free 4 oz jar of coconut oil (or two 4 oz jars for just $0.23).  Right now Vitacost.com is having a special promotion where they will waive their $4.95 shipping free if you buy select participating products here .

Here's how:
1) Use this link to sign up and get a $10 promo code sent to your email.  After you register for an account with Vitacost.com (it must be through the link provided) you will receive an email with the subject line "Here's your $10 coupon for Vitacost.com"

2) Then add the RLC Labs Chromium Picolinate priced at $5.31 to qualify for free shipping.  You’ll basically have an additional $4.39 to spend on whatever product(s) you want with NO money out of pocket after the $10 code!

3) Then add this coconut oil to your cart for $2.46.  You can then add other low dollar items to your cart until it totals $10.  As long as your total is under $10, when you use the $10 off code sent to your email, your order will be completely FREE!

Of course, feel free to look around their website for other items.  You can get another item for free too as long as it is under $4.39.... you might like the Chocolove Almonds and Sea Salt in Dark Chocolate Bar or some of these other low priced chocolate products.  Of course you could also spend more than $10 and just pay the difference (get 2 jars of coconut oil for just $0.23 out of pocket)!

Also, don't forget to add 2 free samples to your cart before checking out (they've got a few different teas and other samples available).  Happy shopping!

Tuesday, February 7, 2012

Basic White Loaves (TWD)

This is our inaugural post for the new group, Tuesdays with Dorie: Baking with Julia.  After four years, we are finally done baking our way through Baking: From My Home to Yours, and now we're diving head first into Baking with Julia. If you would like to join us, just grab a copy of the book Baking with Julia and sign up here.

Our hosts this week were Laurie and Jules.  They chose the basic white loaves.  Without actually looking at the recipe, I was a bit concerned that this would be a time consuming or difficult recipe because, of course, anything to do with Julia and yeast dough must be difficult, right?!

Well, I was pleasantly surprised to find that this recipe was pretty simple.  There are two 1-hour rest periods, but the actual prep time is about 15-20 minutes.  I started this recipe in the morning, and as Dorie notes, my loaves were done by lunch time.


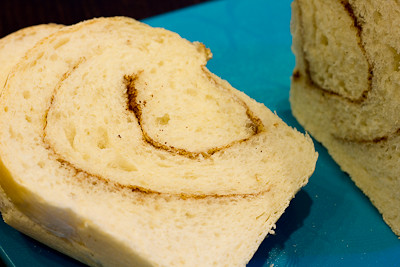
I actually didn't make the basic white loaves. I decided to kick them up a notch.  To my first loaf I added a generous smear of butter and then some Brady Street Cheese Sprinkle from Penzey's.  To my second loaf I added a generous smear of butter and then cinnamon and sugar.  I didn't really measure anything out, just eye balled it, and in retrospect, probably need to add a lot more cinnamon and sugar next time to get the flavors to really come out.  That said, my loaves turned out perfectly! They were golden on the outside and so soft and tender on the inside.  I will definitely be making this one again!

If you would like the recipe, you can find visit Laurie and Jules' blogs, Slush and Someone's in the Kitchen.  You can also go here, to see who else participated in this week's Tuesdays with Dorie.

* Recipe notes:
- I actually made this twice because the first time I used almost dead yeast.  So the second time around I was out of bread flour.  I made it with regular bleached all purpose flour and the bread still turned out fantastic! I am sure it is better with bread flour but if you don't have bread flour that's ok too.
- Another filling I would love to try the next time I make this: pesto or nutella!

Sunday, February 5, 2012

FREE Coconut Oil


*** NOTE: The free shipping promotion has expired (all items under $10 sold out), but you can still sign up to get the $10 off coupon.  You'll have to pay $4.95 shipping for your order if it is under $49, so you can order $10 worth of merchandise and pay $4.95 out of pocket (essentially making it a $5 off coupon).  You could try to make a $5 purchase and see if they will allow you to use the $10 coupon towards shipping costs.  If you do this, please come back and let me know if that works!

Get a free 4 oz jar of coconut oil.  Right now Vitacost.com is having a special promotion where they will waive their $4.95 shipping free if you buy select participating products here .

Here's how:
1) Use this link to sign up and get a $10 promo code sent to your email.  After you register for an account with Vitacost.com (it must be through the link provided) you will receive an email with the subject line "Here's your $10 coupon for Vitacost.com"

2) Then add this Womans Harmony supplement to your cart to get free shipping (it's the lowest priced participating item that is still in stock right now) for $6.76.

3) Then add this coconut oil to your cart for $2.46.  Your total will be under $10 so when you use the $10 off code sent to your email, your order will be completely FREE!

Of course, feel free to look around their website for other items.  You can get another item for free too as long as it is under $3.24.... you might like the Chocolove Almonds and Sea Salt in Dark Chocolate Bar or some of these other low priced chocolate products or you can spend more than that and just pay the difference.

Also, don't forget to add 2 free samples to your cart before checking out (they've got a few different teas and other samples available).  Happy shopping!